Search engines are considering website speed in order to rank them on top. Website speed is one of the factors to get higher ranks in search engines. Caching is one of the method by which you can optimize your website speed. WP Super Cache is one of the best plugin for caching website in no time. Therefore in this guide we are going to get you know how to configure WP Super Cache plugin in your WordPress website with optimum level settings which will help you to handle huge amount of traffic.
First of all you need to install and activate WP Super Cache plugin in your website.
Once you installed and activated WP Super Cache plugin, navigate to Settings >WP Super Cache.
Here you need to configure 2 tabs manually to achieve optimum level of speed.
1. Easy Tab
The very easy method of activate cache tool and make the plugin do its job is to select “Caching On (Recommended)”. This action will activate the cache job on its basic settings.
You still leave all the settings here just after Caching On. But for better and enhanced performance you can tweak further settings in Advance tab.
2. Advance Tab
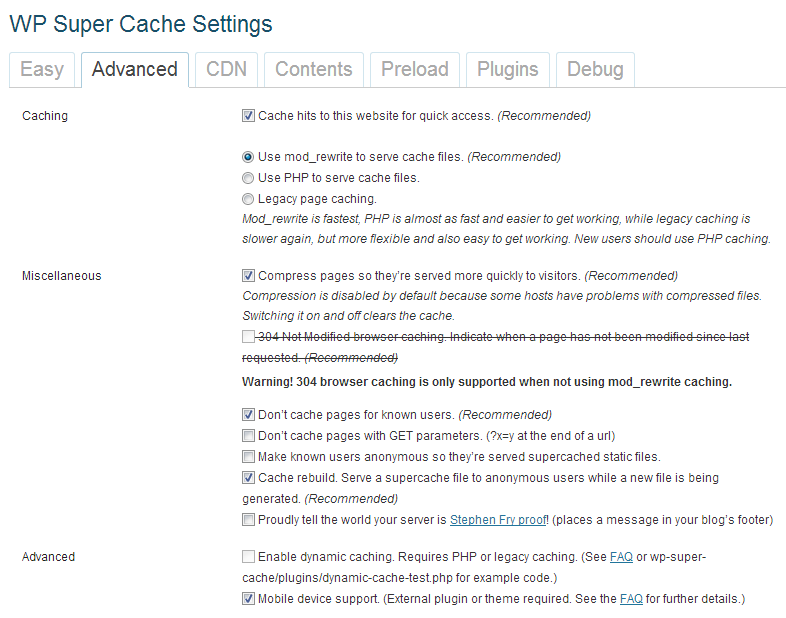
Under advance tab you can configure caching method, miscellaneous and advance settings, mode rewrite rules and expiry time. Select the following things shown below.
- Cache hits to this website for quick access. (Recommended)
- Use mod_rewrite to serve cache files. (Recommended)
- Compress pages so they’re served more quickly to visitors. (Recommended)
- Don’t cache pages for known users. (Recommended)
- Cache rebuild. Serve a supercache file to anonymous users while a new file is being generated. (Recommended)
- Mobile device support. [Note: Select only if You are Using Mobile Theme not the Responsive Theme]
- (Recommended)
Once check all the boxes click on “Update the Settings” and “Update Mod_Rewrite Rules”.
Under Expiry Time and Garbage Collection, set Cache Timeout to 7200 seconds and set Scheduler to Clock on 00:00 HH:MM and set Interval to Jetpack Weekly. Finally click on Change Expiration.
To take advantage of Search Engine Optimization (SEO), remove the entire user agents name under “Reject User Agents” and Save UA Settings. This will server same content to all user agents not different to different user agents.
You are just done with everything here. Just clear the cache for first time.
To clear the cache come under Easy Tab and click on Delete Cache.
Now you can test your websites with Pingdom Tools to check the website speed.


